
Sourdough bread has long been prized by bakers for its tangy flavor, chewy crumb, and crisp crust. Unlike conventional yeast breads, sourdough relies on a natural fermentation process driven by a wild yeast culture, known as a sourdough starter. However, mastering sourdough bread making can be tricky, especially for beginners. Many encounter various challenges along the way that can lead to disappointment. This guide will help you identify and avoid Common Sourdough Bread Mistakes, setting you up for success in your sourdough baking journey.
Common Sourdough Bread Mistakes That Can Kill Your Sourdough Starter

A thriving sourdough starter is the cornerstone of successful sourdough bread. The starter is a living mixture of flour and water inhabited by wild yeast and lactic acid bacteria that give the bread its unique flavor and leavening power. Unfortunately, many new bakers struggle with keeping their starter alive. Understanding Common Sourdough Bread Mistakes that can kill or weaken a starter is crucial.
Common causes of starter death: One of the most frequent mistakes is neglecting the starter by not feeding it regularly. Starters need a consistent feeding schedule typically every 12 to 24 hours, depending on room temperature. Another common cause is exposure to extreme temperatures. Starters thrive in warm conditions, between 70°F and 75°F. However, they can be harmed by excessive heat or cold. If your starter is subjected to temperatures above 85°F, the yeast may die off. Consequently, the bacteria can become dominant, resulting in an off-flavor or a non-functional starter. Conversely, very cold environments can slow the fermentation process down too much.
Water quality matters: Chlorine or other chemicals commonly found in tap water can also kill the wild yeast in your starter. That’s why it’s important to use filtered or bottled water for feeding and maintaining your starter. Many beginner bakers unknowingly use tap water, which gradually weakens their starter until it becomes unusable. For optimal results, always use water that’s free from chemicals.
Neglecting your starter: If you refrigerate your starter when not in use, it requires maintenance even when it’s not being actively used. Weekly feedings are necessary to keep it alive and active. Forgetting to feed it can lead to mold growth or a weakened yeast population, resulting in sluggish fermentation when you finally get around to baking.
For detailed troubleshooting, visit this resource on sourdough starter problems, which can help you resolve any issues with your starter and get it back to optimal health.
Avoid These Sourdough Bread Mistakes When Choosing the Right Flour
One of the most Common Sourdough Bread Mistakes is using the wrong type of flour. The choice of flour significantly impacts the texture, flavor, and structure of your sourdough bread. Different flours have varying levels of protein, which affects gluten development a crucial component for bread structure.
Bread flour vs. all-purpose flour: Bread flour is typically recommended for sourdough. This is because it has a higher protein content, around 12-14%. In contrast, all-purpose flour contains about 10-12% protein. The higher protein in bread flour helps form strong gluten networks. These gluten networks are necessary to trap gas during fermentation. As a result, they create the open crumb structure characteristic of sourdough bread. Using all-purpose flour, which has less protein, may result in a denser loaf with less rise.
Avoid bleached flour: Another mistake is using bleached flour. Bleaching agents can weaken the flour’s gluten-forming ability, which can hinder proper dough development. In sourdough baking, it’s essential to use unbleached flour to ensure that the gluten can develop adequately. This leads to a stronger dough that can hold its shape and trap gas during proofing.
Experimenting with alternative flours: Many bakers are tempted to experiment with different types of flours, such as whole wheat, rye, or spelt. While these flours can add flavor complexity and nutritional benefits to your sourdough, they also present challenges. Whole wheat and rye flours have a higher bran content, which can cut through gluten strands and make the dough more difficult to work with. These flours also absorb more water, which can affect the hydration of the dough. If you decide to experiment, be prepared to adjust your hydration levels and handling techniques to accommodate these differences.
For example, if you want to incorporate whole wheat or rye into your sourdough recipe, you might start by substituting 10-20% of the bread flour with an alternative flour and observe how the dough responds. This gradual adjustment will help you learn how different flours affect the final product without risking the entire loaf. To make the best choice of flour for your sourdough, read more about choosing the right flour for baking.
If you’re curious about experimenting with different flours, you can explore this guide on creative baking techniques.
Common Sourdough Mistakes with Water Usage and Hydration
Water is a critical but often overlooked component in sourdough bread making. Not only is water necessary for hydration, but it also affects the fermentation process and overall dough structure. However, Common Sourdough Bread Mistakes often involve incorrect water usage, leading to issues with dough consistency and fermentation.
Filtered vs. unfiltered tap water: One of the most common errors is using unfiltered tap water. This water often contains chlorine or chloramines. These chemicals can inhibit the wild yeast and bacteria in your starter. Chlorine is added to kill harmful microorganisms. However, it can also weaken your starter over time. As a result, the fermentation process is negatively affected. The best way to avoid this issue is to use filtered or distilled water. This helps when feeding your starter and mixing dough.
Water temperature: Another mistake is using water that’s too hot or too cold. Water that’s too hot (above 95°F) can kill the wild yeast in your starter, while water that’s too cold can slow down fermentation. For optimal fermentation, use lukewarm water, around 80°F. Maintaining the correct temperature is especially important during the winter months when room temperature may be lower than usual. When mixing your dough, always measure the water temperature to ensure consistency and promote a healthy fermentation process.
Hydration levels: Water also plays a key role in dough hydration, which affects the texture of the bread. Higher hydration doughs (those with more water) will produce a more open crumb with larger holes, which is a hallmark of sourdough. However, these high-hydration doughs can be trickier to handle, especially for beginners. A dough that’s too wet can be difficult to shape and transfer to the oven, while a dough that’s too dry can result in a denser loaf with a tighter crumb. Achieving the right hydration level often requires practice and an understanding of how different flours absorb water. Start with a moderate hydration dough (around 70%) and adjust based on the results.
Consistency is key: As with flour, consistency in water quality and quantity is important for achieving consistent results. If you notice that your dough feels different from one bake to the next, it may be due to variations in the water you’re using. Always measure the water accurately and use the same water source to avoid inconsistencies in your bread.
Don’t Skip the Autolyse Step: A Common Sourdough Bread Mistake to Avoid
Autolyse is a technique that involves mixing only flour and water and letting the mixture rest before adding the sourdough starter and salt. Skipping this process is one of the Common Sourdough Bread Mistakes made by beginners who may not understand its importance. However, autolyse is a crucial step that can significantly improve the texture and handling of your dough
Why autolyse matters: During autolyse, the flour absorbs water, and enzymes in the flour begin breaking down starches into sugars, which the yeast will feed on during fermentation. This initial hydration also allows gluten to develop more easily without the need for extensive kneading. By letting the flour and water rest, the dough becomes more elastic, extensible, and easier to shape. Skipping this step can result in a dough that is more difficult to handle and shape, leading to a denser and less open crumb.
How long to autolyse: The duration of autolyse can vary depending on the recipe and the type of flour being used. Some bakers opt for a short autolyse of 20 to 30 minutes, while others prefer a longer rest period of one to two hours. Whole grain flours, such as whole wheat or rye, benefit from longer autolyse periods because they take longer to absorb water. If you’re using these flours, consider extending your autolyse time to ensure that the dough is fully hydrated.
What happens if you skip autolyse: Without autolyse, you may find that your dough lacks the strength and elasticity needed to create an open crumb. You may also need to knead the dough more aggressively to develop gluten, which can result in a denser loaf. Autolyse helps minimize the amount of manual labor needed to achieve a well-developed dough.
Incorporating autolyse into your baking process is a simple yet effective way to improve your sourdough bread. It requires little effort but yields significant improvements in dough texture and handling.
Over-Kneading Your Dough is a Sourdough Baking Mistake to Avoid
Kneading is an essential step in developing gluten in bread dough. However, when it comes to sourdough, over-kneading can be counterproductive and lead to undesirable results. One of the Common Sourdough Bread Mistakes beginners make is treating sourdough like yeasted bread and kneading it excessively.
- Effects of over-kneading: Over-kneading the dough can cause the gluten to become too tight, resulting in a loaf with a tough, chewy texture. The goal in sourdough bread making is to develop the gluten just enough to trap gas and create structure, without making the dough overly elastic. When the gluten is too developed, the dough can resist expansion in the oven, leading to a denser crumb and less rise.
- Alternatives to traditional kneading: Many sourdough bakers prefer to use the stretch-and-fold method instead of traditional kneading. This technique involves gently stretching the dough and folding it over itself at intervals during the bulk fermentation stage. The stretch-and-fold method helps develop the gluten without overworking the dough. It’s a gentler approach that is better suited for high-hydration doughs commonly used in sourdough baking.
- When to stop kneading: A good rule of thumb is to perform the windowpane test to check if the dough has been kneaded enough. To do this, take a small piece of dough and gently stretch it between your fingers. If it forms a thin, translucent membrane without tearing, the gluten has developed sufficiently, and you can stop kneading.
Avoid Under-Proofing: One of the Most Common Sourdough Bread Mistakes
Proofing is the stage where the dough undergoes its final rise before being baked. Proper proofing is crucial for achieving the right texture, structure, and flavor in sourdough bread. However, under-proofing is one of the Common Sourdough Bread Mistakes that can result in a dense, gummy loaf with a tight crumb.
Signs of under-proofing: If the dough hasn’t had enough time to rise and ferment, the resulting bread will have a compact, dense texture. Under-proofed dough may also have uneven holes or tunnels in the crumb, which is a sign that the dough didn’t have enough time to expand and fill out properly. Another sign of under-proofing is poor oven spring, where the loaf fails to rise adequately in the oven.
How long to proof: The proofing time can vary depending on the ambient temperature, the dough’s hydration level, and the strength of the starter. In general, most sourdough recipes require a final proofing time of 4 to 6 hours at room temperature. However, some bakers prefer to cold-proof their dough in the refrigerator for 12 to 24 hours. Cold proofing slows down fermentation, which can help develop more complex flavors and create a lighter, airier crumb.
The poke test: To determine if your dough is properly proofed, use the poke test. Gently press your finger into the dough if the indentation springs back slowly, the dough is ready to be baked. If it springs back too quickly, the dough may need more time to proof. If the dough doesn’t spring back at all, it may be over-proofed.
Cold proofing can be especially helpful if you have a busy schedule, as it allows you to fit the baking process into your day without rushing. If you’re looking for a flavorful recipe that benefits from a long proof, check out these sourdough cinnamon roll recipes.
Over-Proofing the Dough: A Common Sourdough Bread Mistake to Watch For
While under-proofing can result in a dense loaf, over-proofing is another of the Common Sourdough Bread Mistakes that can lead to a flat, deflated loaf with little oven spring. Over-proofed dough has expanded to its maximum capacity and can no longer hold its shape, causing it to collapse during baking.
- Signs of over-proofing: The dough may feel overly slack and lose its structure when transferred to the oven. It may also exhibit large bubbles on the surface, indicating that the gas produced during fermentation has been trapped in pockets rather than evenly distributed throughout the dough. Over-proofed dough will often result in a loaf with a flat top and a dense crumb.
- How to fix over-proofed dough: While it’s challenging to fully recover an over-proofed loaf, you can try reshaping the dough and letting it rest for a shorter period before baking. This may help redistribute the gas and restore some structure to the loaf. However, the best way to avoid over-proofing is to monitor the dough closely and perform the poke test regularly to check its readiness.
Why Not Scoring the Bread Properly is a Common Sourdough Mistake
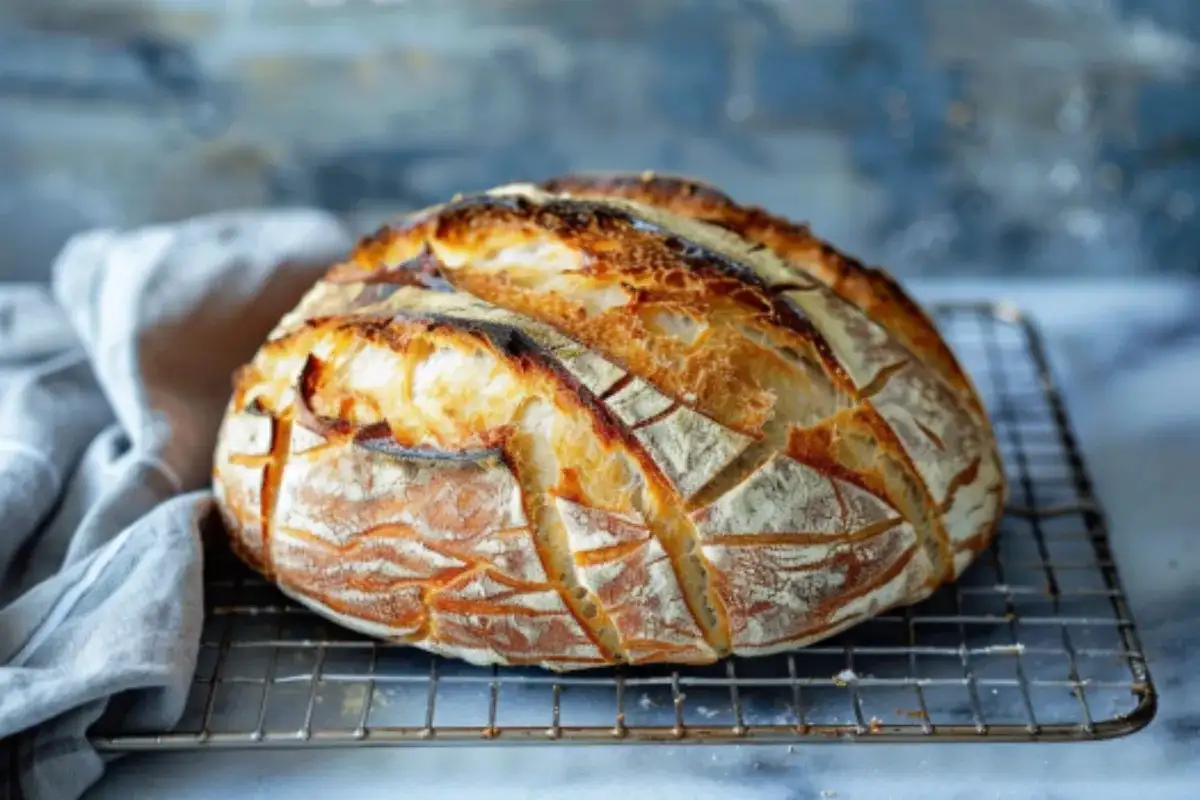
Scoring sourdough bread may seem like a decorative step, but it actually serves a functional purpose. Failing to score properly is one of the Common Sourdough Bread Mistakes. Scoring allows steam to escape during baking, helping the loaf expand and preventing it from bursting unpredictably in the oven.
- Why scoring matters: When the dough bakes, steam builds up inside the loaf, causing it to expand. If the dough isn’t scored, the steam will find its way out through weak spots in the crust, which can lead to an uneven or misshapen loaf. Scoring provides a controlled release for the steam and directs the expansion of the loaf, resulting in a more even rise and a more visually appealing crust.
- Scoring techniques: To score your bread, use a sharp lame or razor blade. Make swift, confident cuts in the dough to create deep enough slashes for steam to escape. The angle and depth of your cuts can affect how the loaf expands in the oven, so it’s worth experimenting with different patterns. Many bakers enjoy creating artistic designs on their loaves, but even a simple single slash can dramatically improve the appearance and texture of your bread.
- Common scoring mistakes: A common mistake is not scoring deeply enough, which can result in weak oven spring. Shallow cuts may not provide enough room for the loaf to expand, leading to a less pronounced rise and a denser crumb. On the other hand, scoring too deeply can cause the loaf to deflate or collapse in the oven.
Baking at the Wrong Temperature: A Major Sourdough Bread Mistake
Baking temperature plays a critical role in the final outcome of your sourdough bread. The temperature of your oven affects the crust, crumb, and overall texture of the bread. However, many bakers fall into Common Sourdough Bread Mistakes by baking at the wrong temperature, which can lead to disappointing results.
Too low or too high temperatures: Baking at a temperature that’s too low will result in a pale, undercooked crust and a dense crumb. The bread may not fully cook through, leaving it with a gummy texture. On the other hand, baking at a temperature that’s too high can cause the crust to burn before the interior has had a chance to fully bake.
Ideal baking temperatures: Most sourdough recipes recommend preheating your oven to around 475°F for the initial bake. After the first 15 minutes, you can reduce the temperature to 450°F to ensure that the bread bakes evenly without burning the crust. It’s important to preheat your oven fully before placing the bread inside to create a hot, steamy environment that encourages oven spring and a crisp crust.
Using a Dutch oven: Many home bakers find success using a Dutch oven for baking sourdough bread. The Dutch oven traps steam during the initial baking phase, which helps create a golden, blistered crust. After the first 20 to 30 minutes of baking with the lid on, you can remove the lid to allow the crust to develop its final color and texture.
Oven spring: Oven spring refers to the rapid rise of the dough during the first few minutes of baking. This is when the loaf expands significantly due to the heat and the steam trapped inside. If your oven isn’t hot enough, you won’t get the full benefit of oven spring, and the loaf may not rise as much as it should. Preheating your oven and using a baking stone or Dutch oven can help maximize oven spring.
Don’t Rush the Process: Baking Too Soon is a Common Sourdough Mistake
Impatience is a common problem among new bakers, especially after waiting hours for the dough to ferment and rise. However, baking the bread too soon before the dough has had enough time to fully proof can result in a dense, poorly-risen loaf with a gummy crumb.
- Consequences of premature baking: If you rush the proofing process, your dough won’t have had enough time to develop the gas needed to create a light, airy crumb. The loaf will likely be dense, with a tight crumb structure that lacks the open holes characteristic of sourdough bread. The crust may also be thicker and tougher than desired.
- How to know when the dough is ready to bake: There are a few ways to tell if your dough is ready to go into the oven. First, look for visual cues such as a significant increase in volume and a soft, jiggly texture. The dough should have expanded significantly during proofing and should feel light and airy. You can also use the poke test—if the indentation springs back slowly, the dough is properly proofed and ready to be baked.
Using Too Much Flour During Shaping: Another Common Sourdough Mistake
Using flour to prevent dough from sticking to the work surface during shaping is essential, but using too much flour can cause problems. Many beginners make the mistake of over-flouring their work surface, which can prevent the dough from sealing properly during shaping.
- Effects of too much flour: When you use too much flour during shaping, the excess flour can prevent the dough from sticking to itself. This can result in large tunnels or holes in the final loaf, which are caused by air pockets that form during baking. These air pockets can create uneven holes in the crumb and detract from the overall texture of the bread.
- Proper flour usage: To avoid using too much flour, lightly dust your work surface with just enough flour to prevent sticking. Focus on using a bench scraper to help manipulate the dough without over-flouring. You can also use wet hands to handle sticky dough instead of adding more flour.
- Handling sticky dough: If your dough is particularly sticky, try giving it time to rest before shaping. Resting the dough allows the gluten to relax, making it easier to handle. You can also use the stretch-and-fold technique during the bulk fermentation stage to build strength and reduce stickiness.
Improper Handling of Sourdough Discard: Avoid This Sourdough Bread Mistake

Many bakers are unsure of what to do with their sourdough discard. This is the portion removed during feeding. Instead of throwing it away, sourdough discard can be used in various delicious recipes. In this way, it reduces waste. Additionally, it adds flavor to other baked goods, making it a versatile ingredient.
- Why discard matters: Sourdough discard still contains active wild yeast and bacteria, which can add a tangy flavor to recipes. It’s a versatile ingredient that can be used in pancakes, crackers, waffles, muffins, and even cookies. Incorporating discard into other recipes is a great way to minimize waste and make the most of your starter.
- How to store discard: If you’re not ready to use your discard right away, you can store it in the refrigerator for up to a week. Alternatively, you can freeze discard for longer storage. When you’re ready to use it, simply thaw it and add it to your favorite recipes. Some bakers even maintain a separate container for discard, so they always have some on hand for baking.
- Creative ways to use discard: Sourdough discard can be used in savory or sweet recipes, depending on your preference. For savory dishes, consider adding discard to pizza dough or flatbreads for a tangy twist. For sweet treats, try using discard in pancakes, waffles, or quick breads. You can find more inspiration for using your discard in these sourdough discard recipes.
Frequently Asked Questions
1. What is the biggest mistake people make with sourdough bread?
- One of the biggest mistakes people make is killing their sourdough starter. Starters require consistent care, including regular feedings and the use of filtered water. Neglecting the starter or exposing it to extreme temperatures can cause it to become inactive, resulting in poor bread quality.
2. How can I tell if my dough is under-proofed or over-proofed?
- Under-proofed dough will feel dense and may not rise properly in the oven, leading to a tight crumb structure. You can perform the poke test if the dough springs back too quickly, it is likely under-proofed. Over-proofed dough, on the other hand, will feel slack and may collapse or flatten. The poke test will show little to no spring-back in over-proofed dough.
3. Can I skip the autolyse step in sourdough bread making?
- While you can technically skip the autolyse stage, doing so may result in a dough that is harder to handle and lacks the ideal gluten development. Autolyse helps the dough become more elastic and easier to shape, which is especially important in sourdough bread making.
4. Why is my sourdough bread dense and gummy?
- A dense and gummy crumb is usually caused by under-proofing or insufficient fermentation. Ensure that your dough is properly proofed by giving it enough time to rise, and check the readiness with the poke test. It can also be a result of not enough steam during baking or a too-low oven temperature.
5. What can I do with sourdough discard?
- Sourdough discard is versatile and can be used in a variety of recipes, such as pancakes, waffles, crackers, and more. Instead of discarding it, you can explore creative ways to use it in other baked goods. Check out some ideas for using sourdough discard here.
Conclusion
Baking sourdough bread is a rewarding process that requires practice, patience, and attention to detail. By avoiding these common mistakes, you can improve your results and produce beautiful, flavorful loaves that showcase the unique qualities of sourdough. As with any craft, the key to mastering sourdough is repetition and learning from each bake. Every loaf you create will bring you closer to understanding the nuances of fermentation, gluten development, and dough handling.
Remember that sourdough baking is as much about the journey as it is about the final product. Don’t be discouraged by the occasional mishap or less-than-perfect loaf. Each mistake is an opportunity to learn and refine your skills.
For more inspiration and ideas, feel free to explore additional sourdough recipes on Talia Recipes. Whether you’re baking a classic loaf or trying out something new, you’ll find plenty of ideas to keep your sourdough journey exciting and fulfilling.